Page Specific Optimization

In the first few sections of this Technical Optimization course we will take a look at page specific optimization factors and how to ensure that your site is structured in a way that takes advantage of every opportunity to present information in a way that search engines can understand.
In this lesson you will learn about optimization of the meta header section of your webpages, and the following lesson will cover optimization of the body elements. These lessons will help your webpages demonstrate topical relevance much more clearly to Google. In turn, Google will give your webpages better rankings in search results related to your content.
The purpose of the meta section of a webpage is to provide information that will help browsers, search engines and other web services properly understand and interact with the webpage.
Meta Header Optimization
The Meta Header section of a webpage appears in the source code, above the body section and is not rendered by web browsers. That means that the meta section is not visible to visitors. The Meta Header section provides search engines with information that provides a critical first impression of the relevance and quality of the page. The goal of optimizing this section is to control how search engines and social networks present this page to their audiences, how your content is categorized in search results and to improve page loading time.
There are many different meta tags available, but not all of them should be used. Some recommended meta tags contain duplicate information that is targeted to different channels, while other meta tags are not recommended simply because they are unnecessarily redundant.
While the recommendations in the header section apply to every SEO related page on a site, these elements must be implemented with page specific focus using original content, never duplicated from other pages. The following tags and techniques are recommended for optimizing your meta header section:
Among page specific Header Section SEO elements, the Title is one of the most important.
- It is critically important to include the primary keyword (search query) that the page is targeting within the title, along with some sort of compelling language that will encourage a user to click on the page.
- Often times the Title will be uniformly established to exactly match the Page Title / H1. However, it is best if these items are decoupled, meaning that they should be independently configurable.
- The Title is what Google will use as the bold blue link that appears across the top of your listing on their Search Engine Result Pages. This is a strong indicator to Google what the page is relevant to and it is the primary information that a search engine user will use to determine if they want to click on your page.
- There is a 512 pixel limit for titles in Google’s organic search results. Therefore, the actual number of characters can vary based on the number of skinny or wide characters. On average 57 characters is the max, and if the Title of your page goes over that character limit, Google has an algorithm that can actually create a title of their choosing. At this point you lose control over the user experience, call to action and optimization.
- As a critical SEO attribute it is important to follow the following formula when creating page Titles:
<title>Keyword 1, Call To Action / Compelling Statement or Question</title>
- Note: There is also a Meta Title element that can be used. However, you should not use both a “Title” and a “Meta Title”. If your page is going to use the Meta Title element, it should be formatted as:
<meta name=”title” content=” Keyword 1, Call To Action / Compelling Statement or Question”>
The Meta Description is nearly as important as the Meta Title.
- As an SEO Element the content of the Meta Description is used as a strong indicator as to what the page is about.
- The Meta Description will appear below the Meta Title in Google’s SERPs.
- There is a 920 pixel limit to what Google will display for the page description in their SERPs. Just like the Meta Title, if your Meta Description exceeds the 920 pixel limit, Google’s algorithm will construct it’s own page description for you, eliminating your control over what the user is seeing. Because the pixel limit is based on Google's font, it is difficult to test, however, on average if you keep your descriptions to less than 155 characters you will typically be ok.
- The Meta Description should start with the most important keyword or phrase for that page, and then offer a one-sentence description of what the page is about, with a call to action and preferably use of supporting keywords that have been assigned to that page as appropriate.
- Note: If your title tag makes strong use of buzz words such as Top, Best or Guaranteed, Google is less likely to use your description and more likely to create their own description based on the content of your page. Also, the use of ALL CAPS in meta descriptions is prohibited.
This is regarded as a worthless meta tag for SEO purposes. In the early 2000’s Google’s algorithm put a huge emphasis on the importance of the meta keyword tag. However, by 2004 the importance of this element was significantly depreciated. In 2009 Google’s head of web spam, Matt Cutts, declared that Google no longer uses the Meta Keywords tag. While Google is known for putting out false information, since 2009 many people in the SEO community have dropped the Meta Keywords tag from their optimization strategies. However, a proper keyword assignment for every page is an important part of creating a well orchestrated SEO strategy, and a few tests by SEO professionals have popped up since 2012 that claim adding keywords into the meta keywords tag improved rankings. Meanwhile Bing has said that they use the meta keywords tag to try to identify link spam.
However in 2012 Google released a “Google News Keywords Tag” which shows that Google isn’t necessarily against considering the suggestion of relevant keywords from the person putting up the page. If you are going to use it, make sure you only use between 1-6 keywords. Any more than that could be seen as keyword stuffing and harm your page. Here is the proper tag format:
<meta name=”keywords” content=”keyword 1,keyword 2, keyword 3”>
In 2012 Google introduced the News Keyword tag. This seemed to be a strange move after they had recently declared their sophistication had surpassed the need for a keywords tag… but regardless, this is a good tag to use for news articles for a site that is an approved Google News Partner. Google suggests putting the proper Google news categories where you would want the article to appear, as well as a few related keywords. Here is the proper format:
<news:keywords>category, keyword 1, keyword 2, keyword 3</news:keywords>
Here is a link to the Google Support page about this tag:
Another important header tag for news articles that: 1. Are intended for syndication through Google News, and 2. Are the result of breaking a “big” story, is the “standout tag”. There are two options for using the standout tag:
<link rel=”standout” href=”URL of article”/>
OR
<meta name=”standout” content=”URL of article”/>
Here is a link to the Google Support page about this tag:
The rel=”canonical” tag is critically important in the fight against duplicate content. For sites that may present the same content under multiple URL’s (typically without the webmaster knowing about it), the rel=”canonical” tag will tell Google which page should get the search engine rankings and all of the credit for links pointing to it or any of it’s duplicate URLs. The tag should be formatted as seen below, using the URL that you want all traffic and links to go to.
<link rel=”canonical” href=”http://www.example.com/page”/>
The Robots and Googlebot tags tell search engine spiders whether or not to crawl and index a page. By giving them these instructions you can effectively encourage them to give your page their full attention, or to keep away from content that you do not want them getting into. The format for these tags are:
<meta name = “robots” content = “index,follow”>
If your site has been up for a while, it may have a listing in the Open Directory Project, which is good. However, the problem is, Google can opt to use DMOZ titles and descriptions instead of the ones listed on your pages. If you suspect that this may be the case, then use the following tag to ensure that Google uses the meta title and description you are supplying. Note that there also used to be an additional reference "noydir" that referred to the Yahoo Directory, however because Yahoo closed it's directory in late December 2014, that reference is no longer necessary.
<meta name="robots" content="index,follow,noodp" />
<meta name = “googlebot” content = “index,follow”>
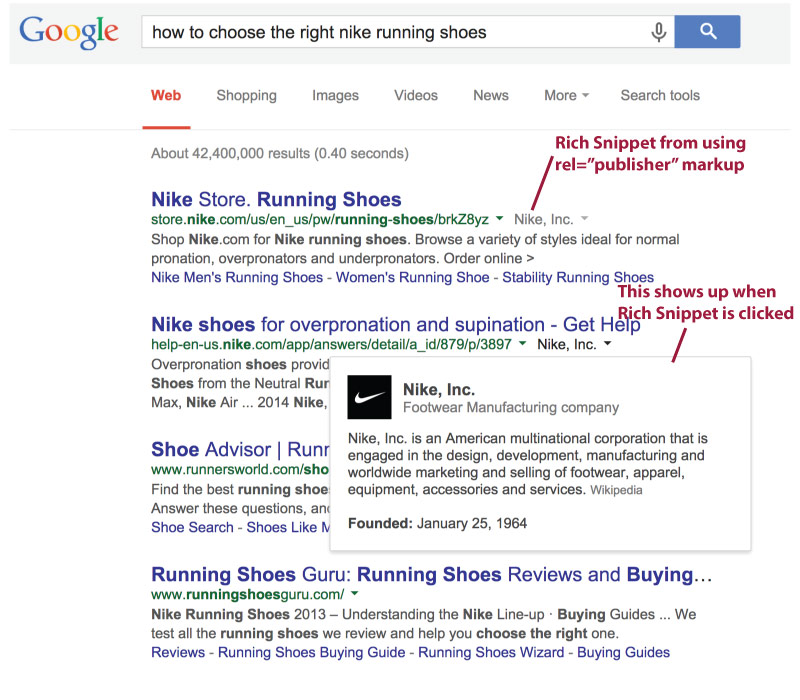
Google Authorship Markup Has Been Discontinued... But, Publisher Markup Remains
Approximately three years after Google introduced rel="author" markup to associate content with the Google Plus profile of the author of that content, and to deliver rich snippets in the search results, Google announced on 8/29/14 the end of support for Authorship mark-up saying that they will no longer support the feature or track any data related to rel="author". However, Google will continue to support rel="publisher" markup.
rel=”publisher” – This is used to link an article or any page on your site to the business profile of the company that should be credited for the content. To implement this, simply add the following tag to the “head” section of every page for which the company wants to claim ownership.
<link rel=”publisher” href=”https://plus.google.com/[Your Business G+ Profile URL]”/>
Example:
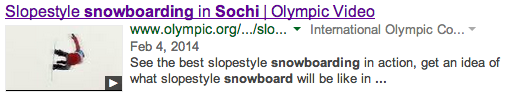
For webpages that feature videos and utilize the Schema.org video markup, search engines may display a thumbnail of your video along with your organic SERP listing along with a little “play” symbol. Google has recently stopped displaying video thumbnails in search results for the vast majority of websites, with the exception being websites that are largely dedicated to video such as YouTube, Vimeo, Vidivodo, ebaumsworld and more. However, this does not necessarily mean that Google will never show video snippets for other websites in the future. There does seem to continue to be some SEO benefit to presenting this optimized video information to search engines.
Example:
The Open Graph protocol enables any web page to become a rich object in a social graph. For instance, this is used on Facebook to allow any web page to have the same functionality as any other object on Facebook.
While many different technologies and schemas exist and could be combined together, there isn't a single technology which provides enough information to richly represent any web page within the social graph. The Open Graph protocol builds on these existing technologies and gives developers one thing to implement.
To turn your web pages into graph objects, you need to add basic metadata to your page. The initial version of the protocol is based on RDFa which means that you'll place additional tags in the
of your web page. The four required properties for every page are:- og:title - The title of your object as it should appear within the facebook news feed. You should write this to speak to your facebook audience and you have 95 characters to do it.
<meta property=”og:title” content=”4 Tips For Getting What You Want In Half The Time”/>
<meta property=”og:type” content=”article”/>
<meta property=”og:image” content=”http://www.example.com/images/photo.jpg”/>
<meta property=”og:url” content=”http://www.example.com/page”/>
<meta property=”og:description” content=” Researchers have concluded a 5 year study identifying habits that allow highly successful people to consistently achieve their goals in half the time it takes average people to achieve similar goals.”/>
<meta property=”fb:admins” content=”USER_ID”/>
Optional OpenGraph Metadata:
There are many different options for open graph data markup, for a full list visit: https://developers.facebook.com/docs/opengraph
The following tags are some of the more common optional og tags:
- og:audio - A URL to an audio file to accompany this object.
- og:description - A one to two sentence description of your object.
- og:locale - The locale these tags are marked up in. Of the format language_TERRITORY. Default is en_US.
- og:locale:alternate - An array of other locales this page is available in.
- og:site_name - If your object is part of a larger web site, the name which should be displayed for the overall site. e.g., "IMDb".
- og:video - A URL to a video file that complements this object.
Twitter cards make it possible for you to attach media experiences to Tweets that link to your content. Simply add a few lines of HTML to your web pages, and users who Tweet links to your content will have a "card" added to the Tweet that’s visible to all of their followers. It makes your Twitter posts display on Twitter very similar to how Facebook posts with URL references display in FB. Here are the important Twitter card elements.
- twitter:card – Choose from the following types of cards: summary, photo or player. Twitter will default to summary if not specified.
<meta name=”twitter:card” content=”summary”>
- twitter:url – This is the URL of the content on your site.
<meta name=”twitter:url” content=”http://www.example.com/page”>
- twitter:title – This is the title as it will be shared. There is a 70 character limit and this should be written to jump out at a Twitter audience, not just a reposting of the page title you already created.
<meta name=”twitter:title” content=”She thought she was buying cute shoes and nearly died when she found…”/>
- twitter:description – This is the description of the content being shared and has a 200 character limit. Remember, this should also be written to grab a Twitter audience.
<meta name=”twitter:description” content=”We’ve all been there, in that moment when you find the deal of the year, a clearance rack wonder that gets your heart racing. But one woman never thought she would end up in…”<
- twitter:image – This is the image that will be displayed on the Twitter Card and it should be square, no smaller than 60x60 pixels.
<meta name=”twitter:image” content=”http://www.example.com/images/pic.jpg”/>
Typically, modern web pages utilize numerous instances of Javascripts to introduce a wide range of functionality to the page. However, Javascript also typically takes longer to load than any other element on the page. Therefore, Javascripts should be combined, minified (to reduce them to their smallest size possible), and externalized.
Browsers are capable of loading multiple elements simultaneously and therefore by externalizing the Javascripts, the browser can load the HTML of the page at the same time that the Javascript is loading.
Also, it is recommended that Javascript that affects the layout of the page be referenced and load from the head section of the source code, while Javascripts that do not affect the page layout load from the bottom of the source code. This is because Javascripts introduce functionality, yet until the user is able to see and interact with the page they are not typically ready to utilize that functionality. Therefore by fully loading the HTML and CSS prior to loading the functionality, the page will appear to load faster for the user.
Because browsers are capable of loading multiple files simultaneously, it is recommended that all CSS is combined, minified and externalized to achieve the faster page loading times. Because CSS introduces the look and feel of the webpage it is recommended that all CSS files are referenced from the
section of the source code so that by the time the HTML loads, the user is able to experience the intended look and feel of the page.While there are many HTML tags that serve a wide variety of purposes, it is important to remember that every bit of code adds to the total data that a browser must load for that page. Additional data requires additional bandwidth and time to fully load. Therefore it is recommended that any unnecessary tags or code are removed to improve the page speed and prevent the most important aspects of the page from being diluted amidst inconsequential code.
Optimized Headers Are A Great Start!
Next In the next lesson we will take a look at all of the key elements of